Showing posts with label master class. Show all posts

Friday, July 8, 2011

New art deco look of an old table

Great idea if you have some old table and a lot of old magazines or advertising in your mail-box. This "how-to" and table itself was created by my namesake Iryna. There are almost no explanations how to do some steps but a lot of pictures are really helpful.
First step for every renovation project is cleaning up and removing old finish using sand paper.

Next - take your magazines and tear pictures you like.
Using glue attach them to the table


Blot table with black acrylic paint:
Cover your table with couple layers of finish. Of course you should let each layer to dry before to put new one
Your table is ready

Friday, June 24, 2011

Cupboard Door-Gone-Art Desk

Author of this idea is Autie. She invented and created these funny and useful tables from real junk.
Детский стол для творчества 
Guess what is the source for these tables? Doors from old cabinets. Kids love art and their own craft table inspires them to do more and more. Children can seat on the floor and draw because of short table stands. Table top that can be opened is another great idea. That gives you space for paper, pencils and other crafts. 
As I mentioned before for creating such kid table you need doors, stands, paint, base, sand paper, screws, drill and everything you think will be useful for decorating.
Детский стол для творчества
First step is sanding of doors, you should remove old paint and/or finish. Clean up the door. Attach stands. If there are no door hinges you should attach them too. Now it's time to decorate. You can do whatever you want, for example you can use decoupage as Autie did.
Step by step instruction  and more pictures can be found here www.u-createcrafts.com. This web page contains huge amount of all kind of handmade and decorating. 

Thursday, May 26, 2011

Marionettes: where to buy, how to make

She came from Czech Republic, her name is Maria and she is a good witch. All who knows me personally knows that my nickname is a which name and also I have nickname flame_witch in LiveJournal, so witches are kinda my mascot.
Why I am posting it here? In my handmade blog? Because it's a handmade, at least I was told that :) And because I like it a lot.
Czech traditional marionettes are usually hand carved from lime wood. I have very simple one but there are marionettes that have movable mouth and ears and have much more than four strings. I found two shops with amazing puppets: www.djepeto.com and www.handmadepuppetdreams.com. Creating marionette is hard and delicate workmanship, but everything is possible and here is some tutorial how to make simple but cute marionette. 
To create this fluffy baby ostrich we need
1) fluffy knitting yarn;
2) crochet hook, size 12;
3) polyester batting; 
4) couple jersey patches;
5) 2 buttons for eyes;
6) threads for embroidery; 
7) 16 inches long wood rail;
8)  pressure sensitive paper;
9) scissors, threads, nails, hammer, needles, awl.
Step 1. Neck Kniting. Make 40 chain stitches, and than 3 rows of single snitches. Fix the thread and left thread around 7 inches long. We need this part of thread to attach head to the body later.
Make legs: make 80 chain stitches and 2 rows of single stitches. 
Make body: create 20 chain stitches and 10 rows of single stitches.  Do not cut the thread. Take your rectangle and fold in half.  Put edges together using slip stitches
Reverse, fill up with the polyester batting, attach edges to each other using slip stitches.
Make head. Create 5 chain stitches,  make circle with 1 single stitch. Make 1 row of single stitches. In second row add one more single stitch in each second stitch. In third add one more single stitch in each 3rd stitch; in 4th row put 2 single stitches in each 4th stitch, and in 5th row put 2 single stitches in each 5th stitch. Make 4 more rows, fill up head with the polyester batting and finish your crochet work.
Step 2. Cut  off jersey beak and paws parts. For beak we need a triangle with 3 inches long sides. Paws are almost oval, 3,5 inches long and 2,5 inches wide. Sew paws and beak. And fill them up with polyester batting.

Step 3. Put together all parts using thread and needle. Attach eyes.
Step 4. Take two threads 40 inches long and two threads 20 inches long. Attach these threads to the top of head, paws and tail using needle. It is better to fix needle in three points on paws or you can add some weight to the paws. It will be easer to control your puppet.
Step 5. Make the control bar. Take wooden rail and cut it to half (8 inches long each). Make cross using 2 nails, you can cover your control bur with pressure sensitive paper. Make holes using awl on the end of each end of cross. Run thread or fishing line through holes, fix it. You are done. 
I would like to say thanks to user ledenikaShe created this tutorial and made pictures. If you like knitting, crochet, embroidery and a lot of others creative, cute and handmade things visit her blog http://ledenika.blogspot.com/

Friday, May 20, 2011

Moo-oo Candle Holder

There are couple things people can look forever: fire, sky, water. You can look to the burning candle for hours moreover if you put your candle in cute candle holder made by yourself you can look at it for a days.
Here is tutorial how to make such candle holder:
Materials and tools:
1) IKEA (or any other cheap) wood photo frames with glass;
2) acrylic black and white paints;
3) glue;
4) spackling paste;
5) gloss and matte finish (spray)
Here is a good example of frames we need:
Step 1. Using glue put together skeleton of future candle holder (use just frames without glass). Then put spackling paste on it, create a bold stoke. Pay more attention and put more paste on corners and joint. Let it dry for a night.
Step 2. Paint it with acrylic paints and cover it with gloss finish.
Step 3. Now you should create picture on glasses, you can just print picture you like and put it under the glass. Than using glass paints and glass outline re-create this picture on glass. After picture is ready and paints are dried cover glass with matte finish. 
See couple more examples of candle holders made using exactly the same technology below.
For this one decoupage was used, pictures on glass are cut of from napkins:
For this one the same frames were used, they just lay down one on top of another. branches and grits were used to make a texture. After all it was covered with gold spray paint (good hand made Christmas gift).
And last one:
I would like to say thanks to SoffiaShark LiveJournal user who created all these candle holders and this tutorial.

Wednesday, March 23, 2011

Old Silverware = Fantastic Ceiling Lamp

This is the one thing that I couldn't even imagine. The ceiling lamp made from spoons? Sounds crazy, but looks gorgeous and creative. It's perfect for kitchen, dining room or bar.
The process of creation is easy and fascinating, you'll enjoy it even if you have never done anything like this.
Step 1. We need set of silverware (will be good if each peace has hole in handler) and old lampshade frame.
Step 2. Now you should remove fat from all spoons-forks-knives you are going to use. You can do it by wiping them with some alcohol containing liquid. Let them dry and cover with base layer of paint. It is more easy to use spray paint for metal or plastic.
Remember that it is really better if you paint silverware outside your house. Paints and finishes are not good for you and your pets.   
Step 3. When everything is covered by paint and dry(you may need couple layers of paint and should let each one dry completely) put on your ex-silverware craquelure. 
You can buy craquelure in any crafts store. Remember you could add only one thin layer of craquelure and be sure that you put it in one direction. 
Step 4. When the layer of craquelure is not sticky anymore (time depends on which craquelure you bought but usually it's 20 minutes) put top layer of paint, color should be contrast to basic one. Paint silverware in the same direction that you put craquelure on it. You can use for top layer acrylic paints.
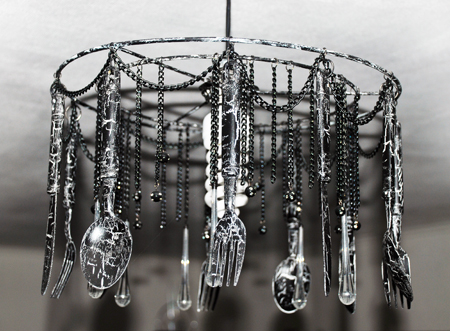
For example,  in process of creation this ceiling lamp white base was used(spray paint for metal) and black acrylic paint for used as top layer. 
If you did everything correctly (and I'm sure you did) in couple minutes you'll see nice cracks on your silverware. 
Step 5. Fix paint with finish. You can use oil based finish or water based finish. Also you can choose any type of it: satin, gloss, etc. 
Step 6. When parts of your ceiling lamp are drying you can work on your lampshade frame. You can paint it, you can add any beads, chains, crystals, flowers, anything. The only one limitation here is your fantasy. For this lamp decorative chains, black beads and crystals were used.  
Step 6. Put together all your parts and attach silverware to frame. 
Lamp socket for this ceiling lamp you can buy in stores like Home Depot or Lowes. This tutorial was prepared by chesta-fiesta and originally posted here.

Thursday, February 24, 2011

Broken Stool = Mosaic Table

There was the following stuff, to be honest some kind of garbage:
1) broken stool without a top
2) cut circle from table top
3) some Polymer Clay circles-flowers
4) two ceramic tiles - white and light blue
5) rods
But if we put everything together.... we can have perfect stylish mosaic table:
All steps of this transformation you can find on the picture below. First of all attach circle from a table top to the stool. Scratch table top and cover it with tile glue. Put on the glue polymer flowers and pieces of tiles. Before you start putting mosaic on glue put it together on the another table. Glue is drying fast so you have only about 15 minutes to transfer your mosaic from one place to other. If you don't use ceramic tiles you can use which best fits your material. When done with mosaic, efface the surface and cover it with oil based finish twice.
Next steps are not required, there is the place for you fantasy and view of your future table.
Take piece of bagging and remove some threads from it. Attach it to the ex-stool. Curve rods and nail it.
Add paper-mache roll to the table edge. Cover everything with bronze spray painting. Put some craquelure and cover everything with black painting. Now you have nice bronze cracks. Cover places you painted with water based finish.
Here is more detailed picture of table stands:
Thanks gashula for sharing this master-class with us. By the way she also makes nice handmade dolls that can be found in her blog. 
This master class was originally posted here.

Wednesday, February 2, 2011

Blue Handpainted Stool

I have not been here for a while as well as I did not post any "how to's". But I'm back and today I would like to show you how to create such a beautiful blue stool. Here are before and after pictures. Amazing, isn't so?

Let's start. Take old and ugly stool:

Next - remove old finish and painting using sanding paper or sanding machine, clean up stool and paint it. Acrylic blue painting was used in this case. You need to put couple layers for brighten and smoothen color.
Now we need to add some decorations. You need to buy some shims and paint them.

Add some patterns to the stands and attach shims using silicone glue or any other adhesive for metal, plastic or wood.  It's better to use transparent glue. That's all: 

Using this approach you can decorate anything in your home, and make it stylish and full of art. 
I would like to say thanks to lendigoo for creating this tutorial and sharing it with us.