I have seen this piece of home decor during my trip to Wellsboro, PA. It was shown in antique shop window. I like the idea and I believe it's not a problem to do such flag to decor home before 4th of July. We need piece of fence and blue, green and white acrylic paints. Now I am thinking about where to find piece of fence :)
- HAND PAINTED GLASS - TUTORIALS - DECORATING IDEAS - FURNITURE REMODELING AND RENOVATIONS -
Showing posts with label holidays. Show all posts
Friday, June 10, 2011
Wednesday, February 9, 2011
Handmade valentines: make it by your own hands
St. Valentine's Day is on next Monday, but it's still more than enough time to create very special valentine for your very special one. Below you can find some ideas and "how to's".
First idea - box with the kiss. For the laziest ones. Take any nice small or big or even huge box. Decorate it with harts, or kisses. If you are the lazy champion, you can just buy nice red box, if not you can cut out hearts, flowers and kisses, buy a lot of small valentines and attach them to the box or buy ready heart shaped stickers and put them to the box
Thats all for this idea. After preparing your box you should come to you Valentine, open box, kiss the air in the box and quickly close it. Your present is ready:) Give it to your sweet hart.
Next idea - Be My Valentine garland:
Step by step instruction you can find here.
Next idea - aromatic valentines made from salt dough.
To create such cute valentines we need:
I like pop-ups cards a lot. So here are couple ideas for them.
If you like these pop-ups you can find how to make them here. There were simple ones. The following requires a way more time and a little more skills but they are really gorgeous:
The templates for these cards you can find below. The larger size is available after click on the picture.
First idea - box with the kiss. For the laziest ones. Take any nice small or big or even huge box. Decorate it with harts, or kisses. If you are the lazy champion, you can just buy nice red box, if not you can cut out hearts, flowers and kisses, buy a lot of small valentines and attach them to the box or buy ready heart shaped stickers and put them to the box
Thats all for this idea. After preparing your box you should come to you Valentine, open box, kiss the air in the box and quickly close it. Your present is ready:) Give it to your sweet hart.
Next idea - Be My Valentine garland:
Step by step instruction you can find here.
Next idea - aromatic valentines made from salt dough.
To create such cute valentines we need:
- cup of flour
- 1/3 cap of salt
- 1/2 tbs of corn starch
- hot water
- fragrance oil
- food color
Mix water and food color. Add water to mix of starch, flour and salt. Brake dough with fragrance oil. Sculpture anything you like (for Valentines day it's probably should be hearts) and put it to the dry and warm place. Let them dry for couple days and then put them everywhere. I like pop-ups cards a lot. So here are couple ideas for them.
If you like these pop-ups you can find how to make them here. There were simple ones. The following requires a way more time and a little more skills but they are really gorgeous:
The templates for these cards you can find below. The larger size is available after click on the picture.
That's all for today. I'll continue tomorrow:)
Labels:
cards,
dough,
holidays,
paper,
valentine's day,
valentines
Wednesday, December 22, 2010
Coffee can = Gift "box"
I made this gift container for my very good friend. Hope she'll enjoy it. Such type of "gift boxes" is good for small and fragile gifts or gift sets (chocolate, coffee, figurines....)
So materials:
1) Empty coffee can
So materials:
1) Empty coffee can
2) Christmas themed napkins. We need to cut out pictures from them:
3) Glue
4) Acrylic paints
5) Thin paper
6) water based finish
Step 1. Make a texture. Mix glue and some water and attach thin paper to your coffee can. Let it dry
Step 2. Cover your coffee can with acrylic paint. Let it dry.
Step 3. Attach cut out picture to jar using water-glue mix. Again let it dry
Step 4. Using acrylic paints add some details, shadows and accents to picture. Let it dry.
Step 4. Cover your jar with water based finish.
Here is the result:
Thats all for Christmas 2010. Merry Christmas and Happy New Year!
Labels:
Christmas,
decoupage,
handmade,
holidays,
how to,
lesson,
master class,
my handmade,
recycled,
remodeling,
renovation,
tutorials
Tuesday, December 21, 2010
Spring Christmas tree
Last Christmas related post for this year. Ok, not last:) Probably there will be one more. But it's definetely last post about Christmas trees. Today I would like to share these really amazing Christmas trees. They are made from real junk.
They are amazing and were created by Cammie. She shared "how to" with us in her blog. Step by step tutorial for first one can be found here and for the second one - here.
She has shop on etsy, where a lot of vintage and recycled things can be found as well as handmade jewelry. Check it out.
They are amazing and were created by Cammie. She shared "how to" with us in her blog. Step by step tutorial for first one can be found here and for the second one - here.
She has shop on etsy, where a lot of vintage and recycled things can be found as well as handmade jewelry. Check it out.
Thursday, December 16, 2010
Paper Christmas Tree
Inspired by all unusual and creative trees I found on internet I decided to create one to bring Christmas spirit to my office. Here is the result:
If you like it here is step by step "how to".
Materials
1. Thin paper. I used the one that usually is put in the shopping bags in fancy stores and in the boxes with shoes:
2. Cone. I bought it in Michaels store but you can make one from thick paper or cardboard
3. Glue. I used glue gun
4. Spray paint (optional)
5. Garlands, ornaments, etc. (optional)
Step 1. Tear paper to make rectangle pieces
Step 2. Bend each piece and fold the corner like it shown on the picture below
Step 3. Attach each piece to the cone. Start from the bottom.
When you done you'll get something like this
Like it? If so you are all set. If no - you can cover your tree with paint and add ornaments, garlands, snowflakes....I cover my tree with silver paint leaving the spots where we can see paper color and putted garland on it.
That's all. Merry Christmas!
Labels:
Christmas,
Christmas tree,
handmade,
holidays,
home decor,
how to,
interior decorations,
lesson,
master class,
my handmade,
paper,
tutorials
Wednesday, December 8, 2010
One more cute Christmas tree
These days everybody is thinking about Christmas and I'm not an exception so let's create Christmas tree.
Materials:
1) paper for base
2) fabric, ribbons, lacing, paillette
3) acrylic paints
4) clay
5) double sided office tape
Step 1. Cut out the paper сone, put it together using office tape.
Step 2. Sculpture the star, paint it using gold paint. Cut fabric, as result you should get strips. Stitch it and add ribbons, lacing, paillette.
Step 3. Paint cone. Using double sided office tape attach rushing to cone.
Done!
I would like to say thanks to ryzhyj-mash, who created this tree, made pictures and shared it with us!
Labels:
Christmas,
Christmas tree,
handmade,
holidays,
home decor,
how to,
lesson,
master class,
tutorials
Tuesday, December 7, 2010
Most Creative Christmas Trees
If you want something new for this Christmas here are couple ideas how to decorate Christmas tree.
Lets start with most traditional tree. For decorating a lot of peacock feather and related colors were used. Butterflies and unusual colors and finally peacock on the top.
Next Christmas tree was designed for shops, the form allows to have trees and a lot of space for customers in the same time. You can also use it for leaving more space for gifts:)
For this Christmas tree you should be a fan of Grolsch beer. Or any beer. And work hard to collect all this bottles before Christmas. This trees are made from empty beer bottles and empty beer cans.
Christmas tree for everyone who loves to read paper books. Now we have iPads, iPhones and all this stuff so it is harder and harder find home with real book. Be extraordinary:
Do you have rung ladder? If so you have a Christmas tree.
What? You have no ladder in your home? ok.. what about paper stickers?
All of the following trees are look good and taste good. Be aware - your guest (or you) can left from last two Christmas tree nothing in couple hours.
Do you love sushi? And know how to cook them? If so next one is for you:
Don't like sushi? What about candies, cookies and marsh-mallow?
You think you have seen all? NO! Potato tree, pasta tree, grits tree and banana tree:
If you have a lot of ties you can also use them as Christmas tree:
Plastic bottles. You must hear a lot how many of them pollute our platen, so be green and save trees and planet, use bottles for Christmas tree:
Two christmas trees that you see below can be a little bit expensive.
Too expensive? So there are budget trees: gloves, junk and wood, one from pencils and one cloth hanger
Cardboard tree:
Feather tree
Lamp tree
Tree for crochet work artists:
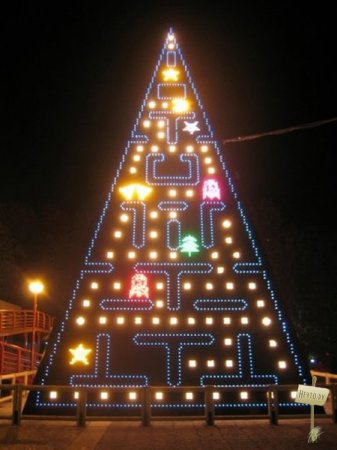
Trees for geeks:
And finally money trees for everybody:
Sources: www.beauty-code.ru; smoking-room.ru; interfax.by; liveinternet.ru; xage.ru; jtadams.multiply.com; ua-wedding.org.ua; he4to.ru; halfme.ru; cheapwholesalejewelry.com; curiousphotos.blogspot.com
Subscribe to:
Posts (Atom)