Thursday, October 28, 2010

Old sewing machine = new unique personalized table

Source http://www.livemaster.ru/topic/. Author - Anastasiya.

Today in 'how to' rubric I would like to told you how to create table from old Singer sewing machine stand. This is a final result:
And here is start point
Materials and tools:
1) Spay paints: white(for table top) and black(for metal stand).
2) Sewing machine stand
3) Table top (the size used for this tutorial 40 inches long and 15 inches wide)
4) Moulding (the size depends on table top size, for this one was used 140 inches moulding)
5) Glass
6) Small nice thing like beads, shells, anything you would like to put under glass
Step 1. Take sewing machine stand remove rust and apply black paint. All painting works should be prepared outside - to avoid covering everething around you with black not removable dust. Apply 2 layers of paint. Let first layer completely dry before putting second one.
Step 2. While your paint is drying take molding and cut it.
Step 3. Put together part of molding (create frame). For this cover molding sides with wood glue or use hot glue gun. After it reverse frame and attach parts together using furniture stapler. Also you can order or buy any frame you like to avoid performing all these manipulation with molding or reuse an old frame.
Step 4. Take liquid nails adhesive and cover line inside frame. Take table top and put it inside frame. If there are some slits add glue.
Step 5. Cover table top with white paint. Put 3-4 layers.
Step 6. After glue and paints are totally dry reverse table top and put together table top and frame using furniture stapler.

Step 7. Measure sizes inside the table, go to store and buy glass:-)
Step 8. Paint table top and frame. 
Step 9. Attach table top to stand using screws. 
Step 10. Put on table top beads, shells, photos....


Step 11. Put glass on top of table. You are done.


Good luck! And don't forget, if you want to share with us tutorial/idea/how to/lessons you created you should just click here

Wednesday, October 27, 2010

Mosaic furniture and home decor

Mosaic is an amazing art. You should be really patient person to work with it and definately talented. Today in my invited guest column master from Ohio, her etsy shop contains a lot of awesome furniture and home decoration stuff. 
Let me start form "Serenade" mosaic table. It has brightly colored bubbles surface through the sparkling waves. I like it the most. 
How great it should be have a morning cup of coffee at such table. 
Next table is named Buena and gorgeous like a previous one:
But not only the tables can be found in this shop. There are a lot of eye-filling frames, trivets and mirrors. My number one frame is Slow Burn:
I really like the colors. Colors are also the reason why I like Summer Stripes mirror:
Hope you fell in love with this shop as I did. There is much more functional mosaic art, I am pretty sure if you check it something will catch your eye! Find your mosaic furniture - click here

Thursday, October 21, 2010

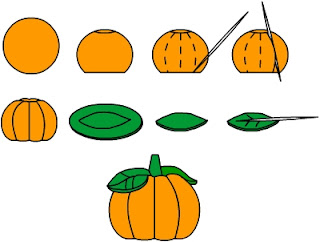
Dough Pumpkins

Today I show you how to create nice small gifts or home decoration for Halloween - Dough Pumpkins.
Materials:
1) Solt
2) Flour
3) Oil
4) Vanilla
5) food colouring (orange and green)
6) Water
7) toothpicks
Step by step instruction in pictures:
Step 1. Mix cup of flour, half a cup of salt, vanilla and 1tbs oil
Step 2. Divide the dough by two equal parts and put in in two different bowls
Step 3. Add a little bit food colouring in each bowl.
Step 4. Add water in each bowl. Dough up. 
Step 5. Your salt dough is ready so you can start creating your pumpkins. 
Step 6. Roll up couple orange balls. Diameter - 1-2 inches.
Step 7. Flat them a little bit by pressing them by your finger on top.
Step 8. Using toothpick create strips. 
Step 9. Roll out the green dough
Step 10. Cut out leaves and using toothpick create leaves fibers.
Step 11. Put leaves on the top of pumpkin. 
Step 12. Bake in 350 degree F oven until pumpkins became hard. 
You can eat them but they are really hard and not tasty:-) Using this technique you can create other Halloween and not only Halloween gifts and decoration. 

Wednesday, October 20, 2010

Magnets, magnets, magnets

The most popular souvenir in whole word is magnets. Each visitor center, each information center, each gift shop has a lot of them: plastic, rubber, metal, wood and "made in China":-). Flags, animals, beautiful views, anything you can imagine. I am collecting the magnets and always bringing a couple from all my trips (like thousands of peoples). I buying magnets as a small gifts for a friends and for my collection (sometime I'll show you my fridge).  I was really happy to find an etsy shop with uncommon and "make me smile" magnets. Moreover they are handmade and unique.
Donna and John create magnets that make you and your fridge laugh, or add some happiness to your office. I have really boring grey file cabinets at my work place so these magnets can add some color to it. This nice dog has name Autumn and Autumn likes fall colors. She is made from birch plywood and painted with acrylics, have artist signature, number and date on back.
The John's vision of of the Shire where Bilbo's home sets in the side of a hill is depicted on the following magnet. John is a big fan of Tolkien's "The Hobbit" and created this great gift for Tolkien fans. 
Last one I want to show you is colortul fish. This fish is handpainted and handcutted by John. If you need to remember something important just let this fish hold the note and you will never forget.
You can buy all magnets shown in this post and a lot of others in this LaughingFridge shop. There is magnets for everybody and for each fridge. Enjoy!

Thursday, October 14, 2010

Country style: decorating kitchen cabinet


The source and idea - ksurex.livejournal.com
Today we will work on old kitchen cabinet. Take a look on picture "before"
Next photo - is "after" photo:
Which one do you like more?:-)

For this transformation we need:
  1. paper wallpapers and/or others pictures you like
  2. acrylic base 
  3. nice new door knobs
  4. glue
  5. paints, brushes and all painting stuff if you plan to draw something on the cabinet. 
  6. water based finish
Step 1. Wash the cabinet. Sand it a little bit if it has a lot of old finish on it.
Step 2. Cover it using acrylic base. Let it to dry.
Step 3. Time for decoupage. Cut out pictures you like. If you plan to cover all surface of sides and top the best source of pictures is wallpapers. 
Step 4.  Apply a layer of decoupage medium (or decoupage glue or just multipurpose glue*) on one side of cabinet. If you want you can apply a layer of glue also on back of wallpapers. 
*Note - if you going to use regular multipurpose glue add some water to it. It should be not to thick.
Step 5. Stick the wallpapers on the glue. Push down the picture, for big picture start from center. Your goal - no wrinkles or air bubbles.  You can also put the glue or decoupage medium on the top of the wallpapers. Let it completely dry.
Step 6. Repeat steps 3-5 for all sides and areas of your cabinet you want to have pictures on. Let it dry completely.  
Step 7. It's time to add your drawing to your already unique and good looking cabinet. Also you can stick the smaller pictures using the same way we used for sticking wallpapers.
Step 8. Apply layer of water based finish on cabinet. Do not use any other type of finish - you can have spots looking like spots of grease if you use any other type of varnish or finish. If needed apply couple layers (3 is more than enough) Let each layer dry before putting next one.
And finally two more pictures to inspire you:


Wednesday, October 13, 2010

Clothes Hanger - hand-painted and hand-decorated

Clothes Hanger... It is hard to find less related to the art thing. It's really personal - almost nobody sees your hangers. Probably only you. Should they be nice? Nobody thinks so, nobody except an extraordinary girl Ulia.
Everybody uses clothes hangers every day but why they so ugly and boring? They can be wood, plastic, metal but all are pretty simple: one color, one form, one design. Ulia decided to make the world a little bit colorful and gives you possibility to have most beautiful hangers in the world for your most beautiful dresses.
She uses for creating her art-hangers acrylic paints, finish, Swarovski crystals, base and all anything else. Her clothes hangers can be used for costumes, dresses, jackets and coats.
I like her sets of hangers with one theme. It should be really cool and stylish to have thematic design in your closet. Especially if you always dress in one style you can have the same style for hangers. For example set "Alice in Wonderland":
Or summer series:
Or French Provence:
Next one should be definitely used for glamorous Halloween costume: 
My favorites green with angels:
Ulia also does custom hangers so you can order any style of your clothes hanger, or you can have couple sets of them - winter, summer, spring, autumn. And for kids it can be great gift - show me the child who does not want to have anything decorated with her or his favorite cartoon character. 
To order these amazing and definitely not usual hangers use the this link  or contact Ulia using  her ICQ  - 294323166. 
Next week I continue the clothes hanger theme - inspired by Ulia I surfed the internet and found a lot of other extraordinary ideas for these ordinary stuff. 

Monday, October 11, 2010

Vintage Hand-painted Shabby Chic Stand "Spring"

I was finally able to finish my next furniture rescue project over weekend - piece of furniture with unknown purpose. I believe it is some kind of entry way furniture but it can be anything:-) So lets name it just stand. Or anything you want.
Unfortunately I don't have picture 'before' but to let you imagine: it was dark brown scratched item that had its best years long time ago. The condition of the stand was not good at all.
Some stuff just do not listen to you, and when you start to work on it the picture in your mind never became true.  This piece is kind of. I had totally different imagination about what it will be. Color, decoration, everething is not that I plan. This furniture piece knew what it wanted to be and I just did what it told to me.
Enough worlds - the mysterious shelf is before the lights.
All drawing are hand-painted:


It has some kind of 3D decorations on top and on sides:) 
I like it but it does not match anything in my interior and  I have no room for it. So it is for sale. If you like it here is my e-mail. Also it is available in my etsy shop. Don't forget that as well as buy existing item you can order custom renovation for your furniture.  

Thursday, October 7, 2010

Pumpkins art. How to carve, make the animals etc..

It's raining and cold outside, all stores are full of Halloween home decorations, pumpkin markets are everywhere. It's October and it's Halloween time. What is the first thing that your imagination is drawing when you are thinking about October 31? I believe its pumpkin. Its time to carve them and create an exclusive home decoration stuff using them.
Today's how to' post will be not exactly a tutorial. This will be collection of ideas with some how to steps. I hope these ideas will inspire you and your home will be full of fall colors, happiness and beautiful handmade autumn decorations.
Let's start from the beginning. Halloween is not Halloween without scary carved pumpkin.
See the ideas of simplest carving:
We will need the following materials:
1) Pumpkins
2) Marker
3) Knife
4) Plate
5) Spoon
6) Ð¡utting board
7) Tea lights
8) Alcohol
9) Printed picture. This picture will be used as pattern for carving. Like these:
 

Let's go.
Step 1. Wash pumpkin, using some alcohol liquid wipe it. Remove top part of pumpkin (it will be cover with 'tail')
Step 2.  Remove all pulp and seeds. Put them to the plate. You can dry seeds and then eat them - it is tasty and useful.
Step 3. Cut out your pattern from the paper and attach it to the pumpkin using push pins or needles. Outline it using marker (of course you can draw the picture without any template). Remove pattern. Take a knife and cut all the way through the pumpkin follow your pattern. If any remove rest of marker lines using some napkin and alcohol.
Step 4. Left it for 12 hours. It should dry a little bit. Put the tea light inside. Done.


Some tricks: if you pumpkin start to fade - put in in the water for couple hours. In cover of pumpkin do couple holes or else the light will fry your pumpkin. If you put some cinnamon inside or just scented tea light you will have not just excellent romantic light but also tasty smell.
Next step of pumpkin art - create tiger or bear.
Lets start with tiger.
Take small pumpkin or squash for nose. Cut top of medium pumpkin (it will be tiger face), remove seeds and pulp from both. Cut out opposite from face side of medium pumpkin for putting nose and lights there. 
Use marker to draw the tiger face. Follow your pattern cut about half of inch of width of pumpkin skin. Fix the nose in the head using toothpicks. Clean up the big pumpkin. It will be the body. Attach the head to it. Instead of  paws use small pumpkins and toothpicks for fixing it. Put light in medium pumpkin. Tiger is ready! 
Next one in our pumpkin zoo - little bear.
For bear you need pumpkins that have different size. 
For body and head take the biggest ones. To attach head and body you can screw through both pumpkins and put the stick(s) on hole(s) and plant another one to on stick(s).
You need four long pumpkins or squashes. Cut their tops and remove seeds and pulp. Attach them to body definitely in the same way you attached head. 
Ears: you need small pumpkins. Cut them to the half and attach to the head. 
Eyes and nose:  they can be created from the smallest pumpkin using the same technology as for ears. 

I gave you some ideas and the basic steps for simple pumpkin art. You can create much complex pumpkin stuff. Good luck.  


Sources of the materials used for preparing this tutorial: http://home-sweet.ru/http://www.podelki.lifemammy.ruhttp://akak.ru/http://www.babylessons.ru/http://women.itop.nethttp://pozdravimka.com/